2. Create Data Table
Once you’ve installed the PubyDoc – Data Tables and Charts WordPress Plugin, it’s time to start creating Data Table. Thanks to the wide functionality of our plugin, this does not require any special programming knowledge.
Creating tables using the PubyDoc plugin is very easy and fun.
Create New Table
To create your first Data table, open the plugin menu in the WordPress admin and select Add Table. Once you click to add a table, you will be automatically sent to create your table.
There are several ways to create data tables: import the table or create it manually. In this article, we will walk through the manual creation of tables. You can learn more about Importing Tables by clicking on the link.

Manually
Title. First, you need to specify the name of the table. Later at any time, it will be possible to change.
Number of columns. Here you can enter the number of required columns for the Data Table. Later at any time, it will be possible to change. (Max 20, but you can add more later)
Number of rows. Here you can enter the number of required rows for the Data Table. Later at any time, it will be possible to change. (Max 200, but you can add more later)
The specified number of columns and rows will appear in the preview.
Here you can specify column names, enter data, sort the columns using drag and drop, or delete unnecessary columns.
And click create table! We will do the rest for you.

Common Interface for Table Builders
After the table is created, you can start filling and customizing it. Now is the time to fill the table with content.
Regardless of which constructor you use, the following options are available to you:
Enter data manually. This is an obvious solution, of course, but you can also just click on the cell and fill it with the required content.
Drag&Drop Sorting. In addition, you have the option to change the order by dragging and dropping columns and rows and making additional adjustments to suit your needs.
!To drag multiple rows, hold down ctrl, select the rows you want, drag the rows, and then releasing ctrl.

Regardless of which builder you are using, you can right-click on the selected cell to bring up a context menu with options:

Insert row. Click here to add a new row to the table, but you can choose to add above or below the current row.
Delete row. Delete the selected row.
Add Column. Click here to add a new column to the table, but you can choose to add left or right the current column.
Delete Column. Delete the selected column.
Copy/Past. You can copy and paste the contents of the cell, or use the keyboard shortcut (ctrl + c / ctrl + v).
Column Setting. To select the column settings, move the mouse over the header and click on the settings icon.

Here you can specify the name of the column, select and configure in detail the type of the column and adapt the column to different devices.
The plugin fully supports the following column types:
- Single line text field
- Text area
- HTML Field
- Numeric Value
- Currency
- Percent
- Percent with Convert
- Date Field
- Button/Link
- Select Field
- File upload
- Media content
Then go to the advanced column settings. You can learn more about column settings here.
How to choose a builder?
The plugin contains two builders, Simple and Extended choose the one that is convenient for you and start filling out the table.
You can switch builders with one click, below we showed an example of choosing a builder.

How to create tables using a Simple builder?
Simple builder. Intuitive interface consisting of several buttons. You can add and customize columns in a couple of clicks. Perfect for quick adding and editing, as well as bulk actions for table content.
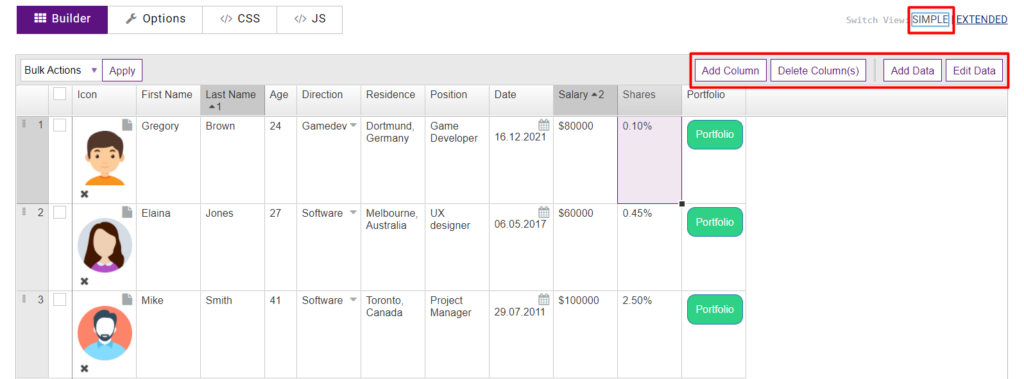
Add Column. Here you can add columns and customize. After clicking, a window will appear in which you can specify the name of the column, select and configure in detail the type of the column and adapt the column to different devices. Then go to the advanced column settings. You can learn more about column settings here.

Delete Column(s). Select one or more columns and click delete columns, after which they will disappear from the table.
Add Data. After clicking on the button, in the popup that opens, you can enter data according to each column of the table, then click save and a row with the entered data will be added to the table.
Edit Data. Select the required line and click the “Edit data” button. After that, in the popup that opens, you can conveniently make the necessary changes to the row for each column and save.

Bulk Action. Here you can apply an action to several table elements at once. For example, to delete several lines, select them with a tick, select the type of action, in our case, delete and click “Apply”. Then the selected columns will be deleted.
How to create tables using an Extended builder?
Extended builder. Has a wider set of options and content settings in the table. But it’s still as easy to use as possible. If you’ve worked at Excel, then the interface will definitely be familiar.

Adding and removing columns. To add or remove columns, click on the “Columns” icon on the builder panel.
Adding and removing rows. To add or remove columns, click on the “Rows” icon on the builder panel.

Hide or remove the selected rows/columns on the frontend.
Hide rows (can be useful for placing intermediate calculations),
Remove rows (can be useful for placing information for admin side only).

Also, the extended builder fully supports the following configurable options:
- Text settings. Size, style, font, color, text alignment
- Cell background color.
- Merging cells
- Insert links, media, comments.
- Formulas.
- Add conditional formatting to cells
- Add editable field.
- Convert the cell content into icon with tooltip.
- Make the rows collapsible.
- Do shortcodes in the selected cells.
- Enable Multiple Sorting
- Show column letters
- Show filter row
- And also create charts by manually selecting a range directly from the table builder.
Customize Table Options
The data table has many options that will make the table very convenient and stylish for absolutely any purpose. You can customize each Table element, including sorting, search, pagination, Data formats, Appearance and custom table styles, and many more options. We recommend that you study this article to learn more about how to configure table options.

Add Data Table to the Site Content
Once you’ve created and configured your table, it’s time to add it to your site. This can be done in 5 different ways.
You can find the shortcodes in the table settings in the upper left corner of the panel. Just select the required code from the dropdown menu and copy it.

Table Shortcode: let’s display the table in the site content
Table Part Shortcode: let’s display just a part of the table in the site content. You can display several rows or cols, for example, ‘row=1,2,3’, or set diapason: ‘row=1-3’ or ‘row=1-3,6’
Cell Shortcode: let’s display a table with a single cell in the site content
Value Shortcode: let’s display a value of a single table cell in the site content
PHP code: lets display the table through themes/plugins files (for example in the site footer). You can use any shortcode in this way.
Alternatively, the Table Shortcode can be found in the left navigation menu by clicking Tables.

Copy the required table code and paste it into the page content.
Check out this article for more details.
Our detailed documentation
As you can see with our plugin, you don’t need to worry about the technical side of your spreadsheet.
Check out our detailed documentation.
This will help you figure out how to get the most out of the plugin. Make your table interface stylish and user-friendly.
Delight your users with new solutions with the PubyDoc plugin.