How to create a pricing table?
If you are running an e-commerce site that sells one or more products, then you should consider choosing an effective pricing table plugin that is easy to use and helps increase conversions.
Pricing tables allow you to present your offer to your visitors in a very elegant way. Make what you sell attractive. This will make it easier for customers to understand what you offer and on what terms.
Pricing table plugins have come a long way in WordPress. There are many plugins available with pricing tables that make it easy to get lost and choose the right one.
Fortunately, with the PubyDoc DataTable and Charts plugin, you can quickly and efficiently create price tables in handy builders with all the options you need.
Let’s start
The plugin has all the necessary options for creating a Pricing Table, in this example, we will need: cell merging, alignment, cell format settings, text size and font, cell fill color, disabling the header option, and a little magic in the CSS editor.
Let’s create a pricing plan for the subscription. To do so, move to the Data Table plugin menu in your WP Dashboard and click Add table button.
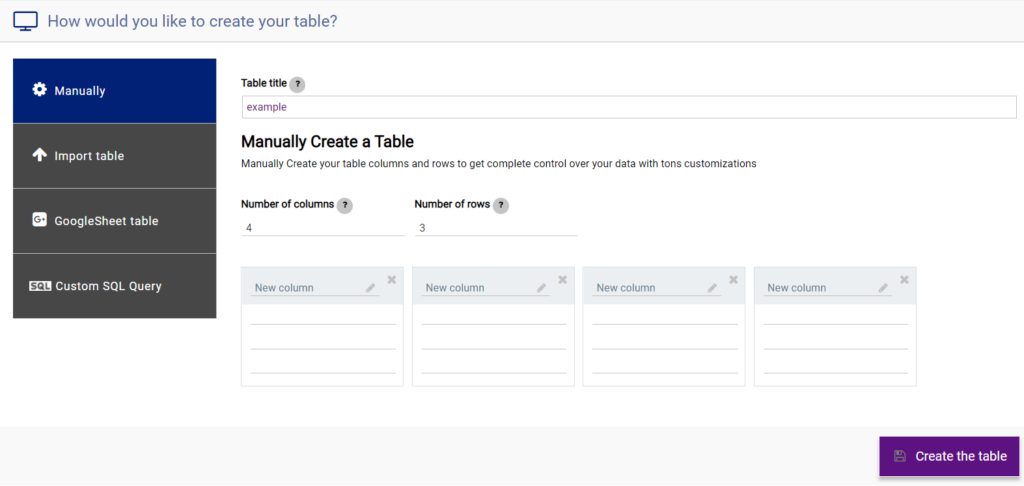
Enter Data
As you understand, each pricing table is individual and depends directly on the characteristics of your product. In our example, we use the characteristics of a subscription with its name, price, main characteristics, and an action button.

Disable Header
So that the header does not interfere with us, let’s go-to options->header and turn it off for this table.

Merging cells
This option will definitely be useful to us, for example, let’s combine extra cells for a more pleasant display. Select the desired cells and click on the Merge Cells option icon in the extended builder mode.

Cells format
But as you may have noticed, each cell has a different format has different data format. You ask: “Puby, how did you do that?”.. “Easy!”, – we will answer.
To set a particular cell or range of cells to have its own data format, select the cell or range of cells and click on the Formats for cells value option.

Here, you can set the following cell types:
- Single line text field.
- Text area.
- HTML Field.
- Numeric Value.
- For Numeric columns, you can specify Number format. Set cells output format e.g. 1,000.00, 1.00, 1,000. Use format 1. for integer. Set no value to use the default format.
- Currency.
- For Currency columns, you can specify Currency format. Set cells output format for currencies. For example: $ 1,000.000; € 1.00; Set no value to use the default format.
- Percent.
- For Percent columns, you can specify Percent format. Set cells output format for percent numbers. For example: 10.00%; 10%. Set no value to use the default format.
- Percent with Convert.
- For Percent with convert columns, you can specify Percent format. Percent with Convert format sets percent format and convert cells value to percentage by division by 100. Set cells output format for percent numbers. For example: 10.00%; 10%. Set no value to use the default format.
- Date Field.
- For Date columns, you can specify Date format. Here it is enough to select the desired date display format from the list.
- Select Field. Enter each choice on a new line, then in the table cell, select the option you want from the drop-down list.
- File upload. A button will appear in each column to load media into a table, just click and select the desired file from your device, or the WordPress gallery.
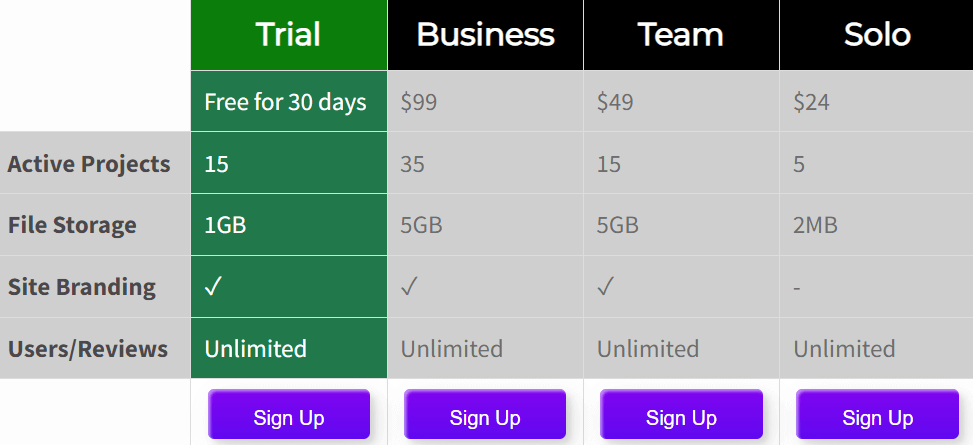
The same with the other cells. For example, if you need to add a check icon to the table, you can select the cells and set them in HTML field format.
Look for the corresponding HTML code. In the example it’s ✓ and then paste it to the cell.

How did we make these buttons?
In this example, we used HTML format cells to add the “Sign In” button to the table. After changing the format of the cell, click on its contents, enter the HTML code of your button here, To make the button look like in our example, enter the following code: <button class="custom-btn btn-2">Sign Up</button>

Then use the CSS editor to style its appearance. Check out this article to learn more about styling custom buttons in CSS. If you want to style the button in the same way as in our example, enter the following code in the CSS editor:
.custom-btn {
width: 130px;
height: 40px;
color: #fff;
border-radius: 5px;
padding: 10px 25px;
font-family: 'Lato', sans-serif;
font-weight: 500;
background: transparent;
cursor: pointer;
transition: all 0.3s ease;
position: relative;
display: inline-block;
box-shadow:inset 2px 2px 2px 0px rgba(255,255,255,.5),
7px 7px 20px 0px rgba(0,0,0,.1),
4px 4px 5px 0px rgba(0,0,0,.1);
outline: none;
}
.btn-2 {
background: rgb(96,9,240);
background: linear-gradient(0deg, rgba(96,9,240,1) 0%, rgba(129,5,240,1) 100%);
border: none;
}
.btn-2:before {
height: 0%;
width: 2px;
}
.btn-2:hover {
box-shadow: 4px 4px 6px 0 rgba(255,255,255,.5),
-4px -4px 6px 0 rgba(116, 125, 136, .5),
inset -4px -4px 6px 0 rgba(255,255,255,.2),
inset 4px 4px 6px 0 rgba(0, 0, 0, .4);
}

This is just an example, in fact, you can use any of your button options.
Here’s what we got:
Here is another Pricing Table example created with the PubyDoc Data Table and Charts plugin:
| Beginning | Basic | Professional |
| $99 | $129 | $199 |
| 1 domain | 3 domain | Unlimited Domain |
| 1 year premium support | 1 year premium support | 1 year premium support |
| 1 year of monthly updates | 1 year of monthly updates | 1 year of monthly updates |