Price is the first thing users want to see when they visit a product or service website. A pricing table allows your potential customers to quickly compare the various offers and opportunities in a pricing structure in a convenient visualization. Pricing tables can be very effective in increasing your sales.
The pricing and plan are some of the most common elements of any e-commerce website. To sell digital products online, you should have a pricing list on your website, and here are the reasons why:
- it tells your customers what your prices are
- it helps customers make purchasing decisions
- it can be very effective at increasing sales
- it can enhance reliance because pricing information with prices puts the consumer at ease since it creates trust in your business and conveys a sense of professionalism and quality
- it shows comparisons because it is easier for customers to compare different offers when they’re placed at one table
Tips For Making Pricing Tables
- Reduce the usage of the word price as much as possible. Instead, use things like “the cost of subscription” or “what you’ll pay for one-year membership”.
- Recent research has shown that the usage of round numbers and prices ending in “.99 ” led to increased sales e.g. if you are seeking a book for 50$, it might be more effective to sell it for 49$ than 51$.
- Place items in a pricing table in descending order based on quantity is usually a better option because prices are more stable.
- The pricing list should be straightforward, clear, and always explained in simple words.
- Make sure that the pricing plan is eye-catching and looks professional.
- Do not forget about the call to action button.
Creating and styling pricing tables can be problematic if you’re not familiar with HTML and CSS. A good plugin for table creation should include plenty of columns, font, color, and icon options and support images, videos, custom buttons, etc.
PubyDoc Data Table and Charts is a plugin that aims to make it easy for people to set up attractive style tables. It provides a design with a color scheme that can be customized through a handy settings panel in the WP Dashboard.
The pricing table is responsive and has a settings panel where you can easily change the appearance of the table and its columns. You can set the title, price, features, offer expiration date, button text, URL, column color, etc.
| Beginning | Basic | Professional |
| $99 | $129 | $199 |
| 1 domain | 3 domain | Unlimited Domain |
| 1 year premium support | 1 year premium support | 1 year premium support |
| 1 year of monthly updates | 1 year of monthly updates | 1 year of monthly updates |
Tables can be displayed using an automatically generated shortcode. The plugin allows you to create multiple pricing tables and add separate output options for them, i.e. each table will have its own styling. The plugin provides an interface that allows you to quickly create, modify and visualize your pricing table columns. The Data Table WordPress plugin is one of the fastest ways to create an attractive pricing table that doesn’t even require digging into the code.
Okay! Let’s proceed to the design part.
Step #1: Prepare Your Design
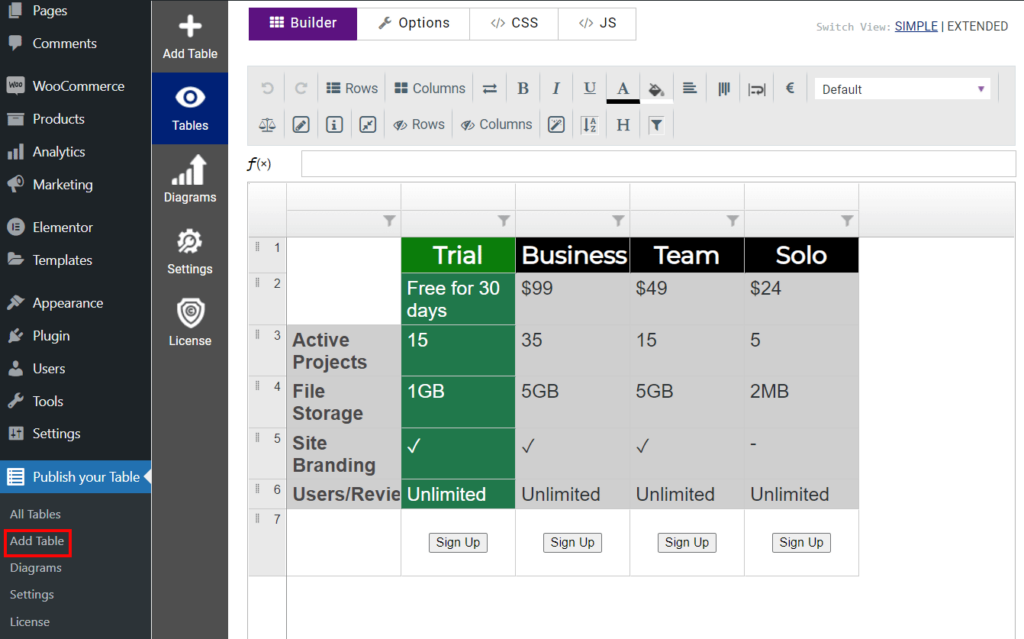
Login to your WordPress admin panel dashboard. Install and activate PubyDoc Data Table and Charts. If you have already installed it, make sure that it’s up-to-date. Now, open the plugin dashboard and click the Add Table button.
The plugin allows you to create any design you want. The only limitation you have is your imagination. So, you can create as many columns as you need and style them up using the built-in customization settings.
If you are up to HTML and CSS you can easily customize the table using the CSS tab while on the table editor page.
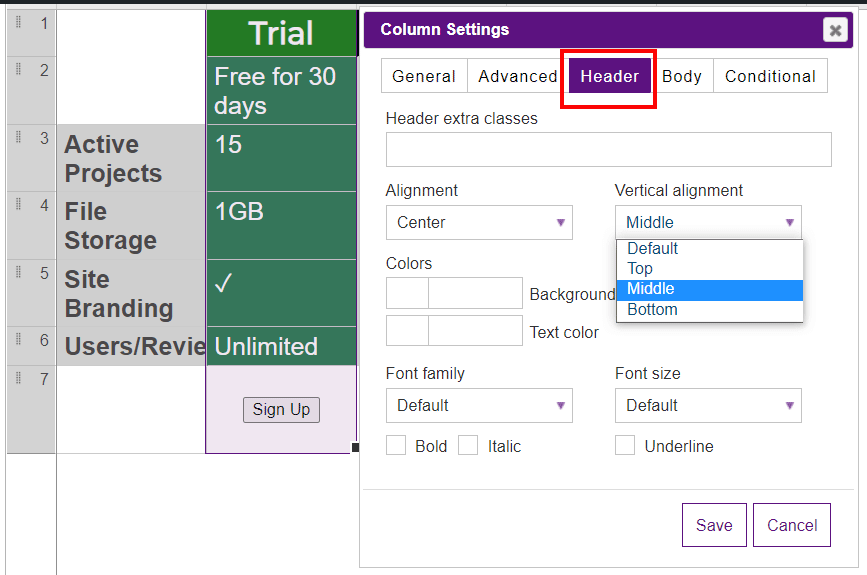
Step #2: Customizing the Header
You can customize the header title text, show or hide the border, etc. However, the header will be on center alignment by default, you can easily change its position.
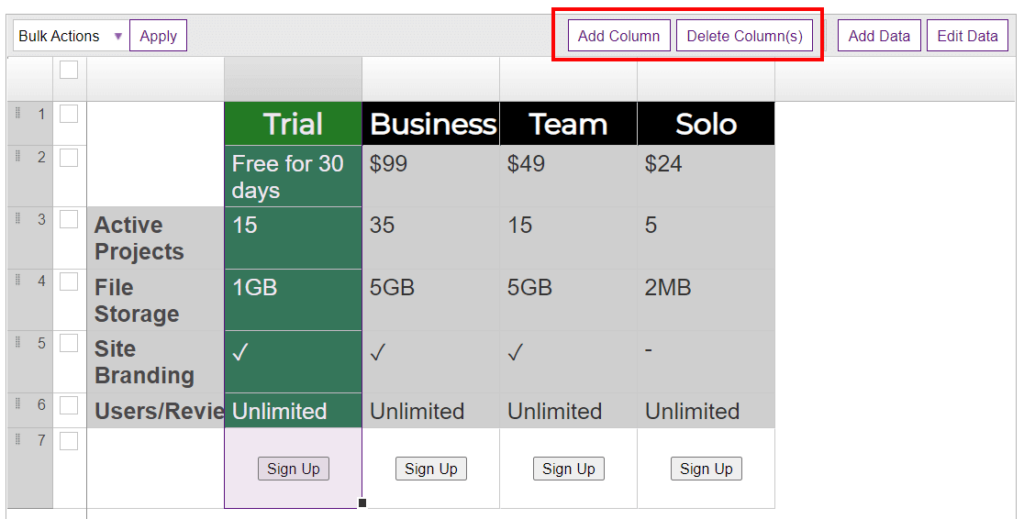
Step #3: Arranging Columns
By default, each table contains three columns. But, that’s not a big deal. You can add more or remove existing columns if needed.
To remove a column, select the column and click Delete Column(s) button. If you accidentally remove the column you can easily undo the action. To do so, proceed to the Extended builder and click the corresponding button.
However, you can also remove the rows from the table. To do this, you have to click the empty box near the row and then select Delete in the dropdown.
To add a column, click the Add Column button.
Step #4: Changing the Pricing Tags
To customize the price, click the gear icon near the title, and in the opened window set the needed currency format in the corresponding field. Besides, you can change the CTA buttons, description, and more, please check our detailed guide which helps you create an astonishing pricing table.
We just completed designing our pricing table. Let’s take a look at the final stage of our pricing table.